Apply for a ND Supplier-Payee Account
The OMB Vendor Registry Office works with North Dakota state agencies to create supplier-payee profiles in the state’s payment and financial reporting system. Vendor Registry does not issue payments or conduct business with suppliers and therefore has no information about program procedures, application or payment statuses. Intended payment recipients should contact the agency administering the program for assistance and questions.
- From the State of ND Payee Portal, click “Registration Menu”. Read application descriptions carefully.
Choose the Supplier-Payee Application - No Email Invitation Received Instructions option if you are a new supplier-payee applicant and expecting payment from an ND state agency.

Choose which type of entity you represent:
a. Individual
b. Business
- Click Next
- Company Identification Number: Enter a unique number of your choosing between 4 to 6 numbers
- Tax Identification Number: Enter the Tax Identification Number (TIN) used to file with IRS. Individuals enter a SSN.
- Company Name: Enter the legal name for this supplier-payee profile. Do not use commas or apostrophes in the business name. The name must be the owner of the TIN given. Individuals enter format LAST, FIRST, MI.
- Additional Name: If a Doing Business As (DBA) or Also Known As (AKA) name is used for this profile’s payments instead of company legal name, enter the business name here. Do not use commas or apostrophes in the business name.
- Provide a website address (URL) of the company. This field is optional.
- Choose if this is for a US-Based (default) or Foreign-Based payee profile.
IRS 1099 reporting for supplier-payees is similar a W-2. Payments must be reported to the IRS for tax purposes.. As a business, choose the options for your tax reporting needs. Contact your CPA for questions.
- Tax Classification: Click the magnifying glass and choose the correct organizational tax classification.
- Do you report payment information to IRS?: All individuals and most businesses should choose YES for this question.
OMB/IRS Form Link: If a current W-9 is not available, click the link to download and complete the correct IRS form. Once completed, save it to your computer and select the document for attachment.
a. Click “Add Attachment” link.
b. Select the Attachment Type which describes the document from the drop-down list.
c. Click Add Attachment button.
d. Click Choose File and browse to the place where the file is saved to attach.
i. Once the file is chosen, click Upload.
e. Click OK to return and continue.
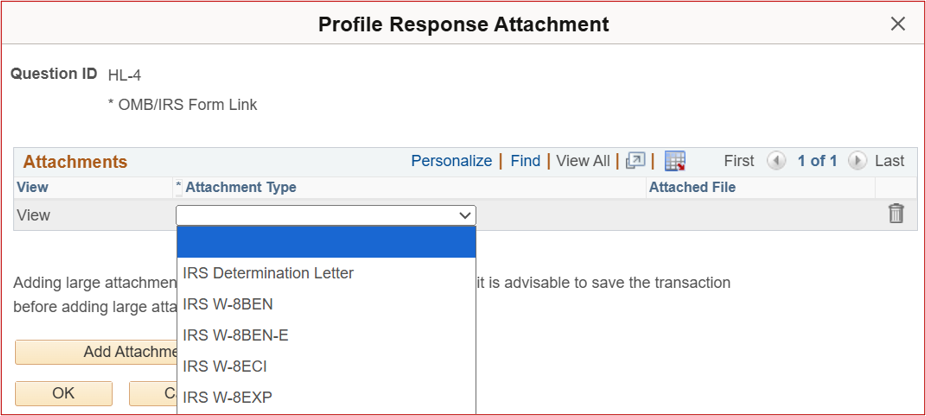
- Non-profit or federally tax exempt? Upload a copy of the issued “IRS Determination Letter”.
- Enter special program code if applicable: If you were given a specific program code by the agency you are doing business with, enter that code here, otherwise, leave it blank.
- Primary Address: Enter the mailing address where payment and tax correspondence are to be sent. Use your mailing headquarters as the Primary Address.
- Additional Address (Optional): Enter additional payment addresses for your account.
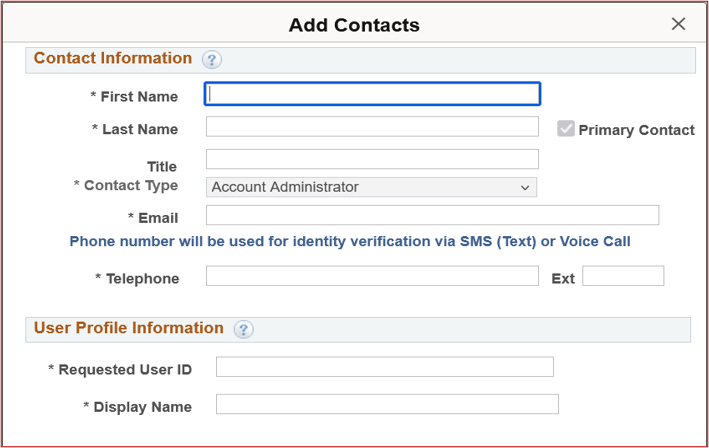
Create at least one Primary Contact. Only a contact designated with an Account Administrator Contact Type will be able to login and update the supplier-payee profile once the application is approved.
- Click Add Contact.
- Enter contact information and choose the Contact Type. Primary Contacts and Contact Type of Account Administrator require a User ID.
User Profile Information: Approved user-contacts will have online access for the ND Supplier Payee Portal and are allowed to submit change requests of an approved supplier-payee profile.
Create a User ID for the Account Administrator.
- Every contact must be linked to a Designated Address.
- Click Next when all contacts are done being added.
Each payment address requires a payment method. The default payment method is "Check". To keep the default skip to “Set Payment Method for Address”.
- Click Add Payment Method to add an alternate payment method such as ACH (direct deposit).
- Payment Method: Choose the Payment Method being added.
- Enter email address for notification of payment.
- Email Confirmation: Opt-in to receive payment advice for ACH/Direct Deposit.
- Enter Banking Information: U.S.-based bank only.
- Personal Account: Check if this is for a personal bank account.
Set Payment Method for Address
Each address must have a chosen Payment Method.
- Click the drop down and choose the payment method option available.
- Click Next when all addresses have a payment method specified.
The application is ready to be submitted. Allow 1-2 business days for review and processing. Status updates will be emailed to the email address used on the application.
- Click Review to verify your application information for accuracy.
- Click Terms of Agreement and read the Terms and Conditions of submitting the application.
- Click Select to accept the Terms of Agreement below check box.
- Click Submit.